Use this Jedi mind trick to fly perfect steep turns

by
Posted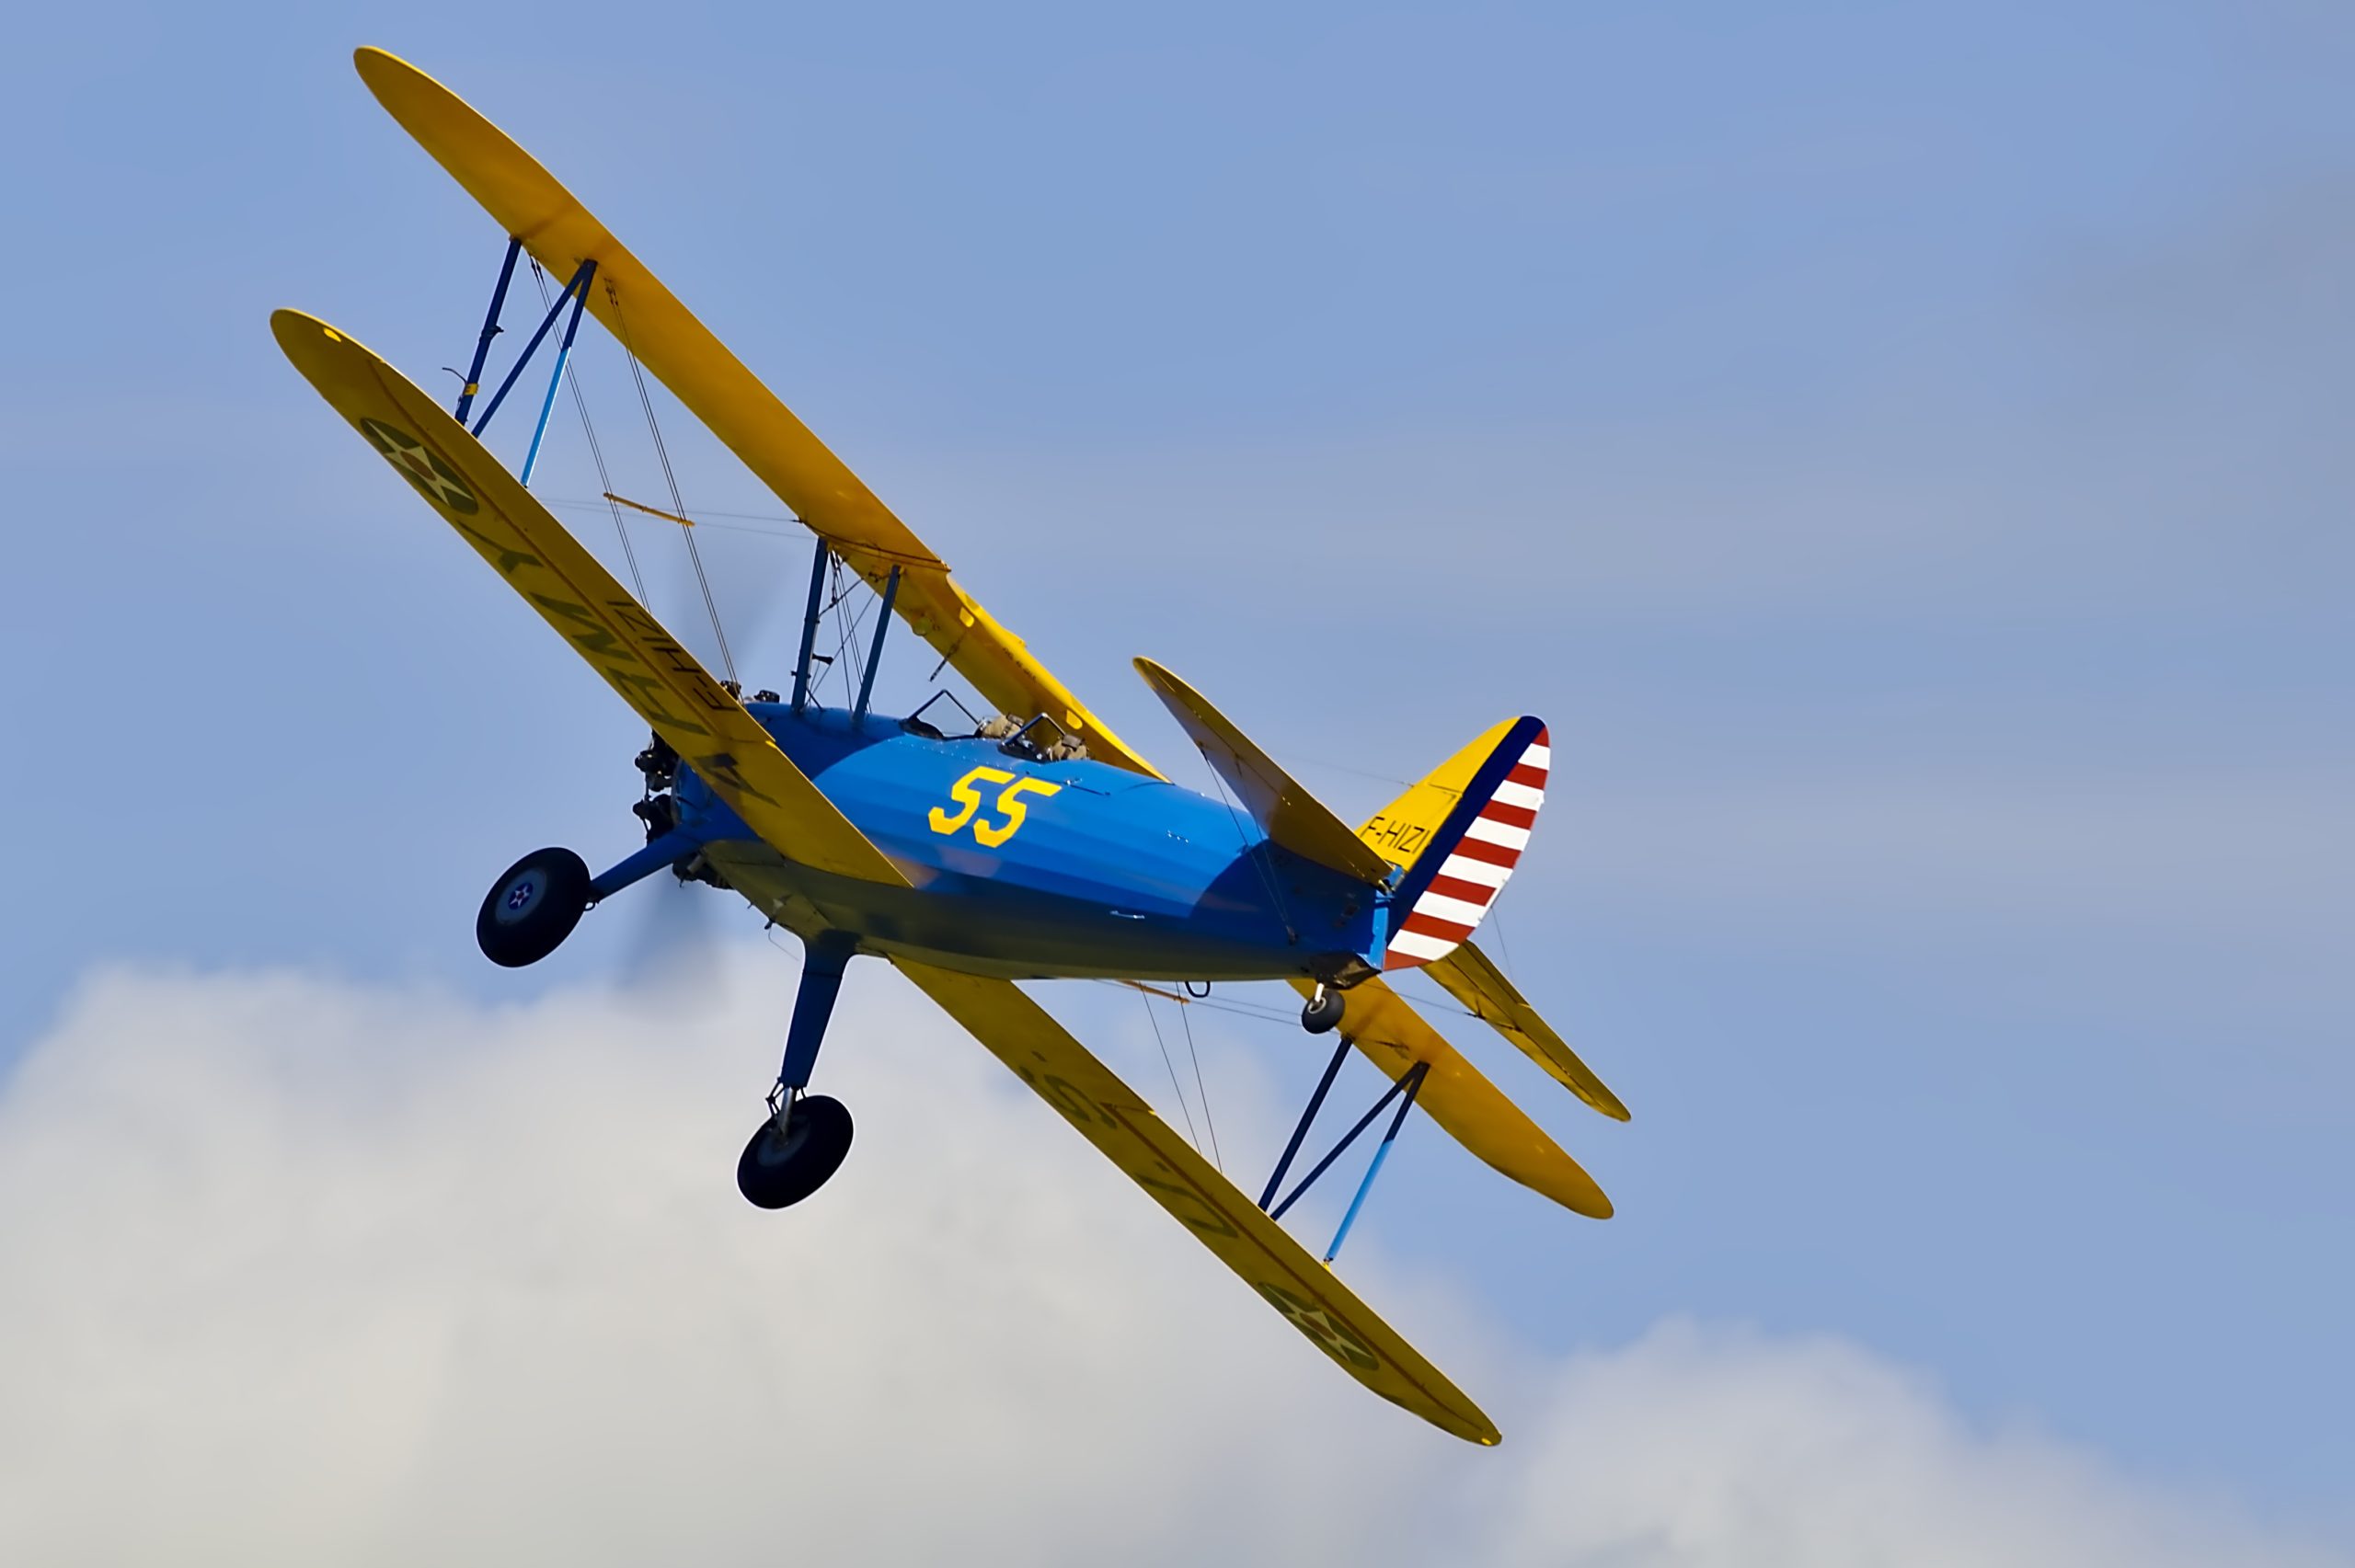
Ok, clickbait title, I know. But it worked. You’re here, now. So let’s begin.
SCENARIO: a new student is asked to demonstrate a steep turn. They roll the aircraft to 45° bank (correctly), add some power (correctly), lose 200 feet in four seconds, and then spend the next 30 seconds sawing back and forth on the elevator trying to get back to their initial altitude, in a roller-coaster up-and-down wild ride. Alternatively, the student doesn’t pull on the elevator at all, and the aircraft swiftly enters a powered spiral dive, forcing the instructor to intervene in order to prevent loss of life.
Why do people find steep turns difficult? I’m going to suggest it’s because they’re not thinking about them the right way. So here are the two individual problems which make entering, maintaining and exiting a 45° banked turn in level flight tricky. Afterwards we’ll work out what to do about them.
Problem the first: out of trim
It’s a certification requirement for an airplane to have an adequate and positive stick force gradient, or stick-force-per-g. That means that beginning from an in-trim situation, any manoeuvre that has a positive g-load (greater than 1g) must require the pilot to pull back on the yoke. And that pull has to be stronger, the more g the aircraft is to generate. The opposite applies too: starting in trim, a change to less than one (or to negative) g must require a definite push on the yoke.
You can be pretty sure that your airplane has an appropriate stick-force-per-g value: so when you want to fly a 45° bank turn in level flight, which requires 1.4g, generating that extra 0.4g from an in-trim situation is going to need a positive pull on the yoke – probably about 10lbs of it.
Now this has nothing (yet) to do with generating the extra lift you need in a turn – we’ll come to that later. 10lbs of pull just keeps the elevator in the same position as prior to the turn, because of the geometry of the airflow over the tail along with whatever adjustments (bob-weights, springs, motors, etc) the manufacturer has added to the control system.
Summarizing: flying an aircraft in a steep turn adds 10lbs required pull to the yoke force – just as if the airplane had suddenly gone wildly out of trim. Which, essentially, it has. Remember your very first flying lesson, when your instructor demonstrated the power of the trim control, and showed you how difficult it is to maintain altitude with the plane mis-trimmed? That’s the first problem: we’re back there again.
Problem the second: lack of pitch reference
Doubtless you spent the first hour or five (or forty five) of your flight training learning to find the right horizon position in the windshield to maintain level flight. About a third of the way up from the instrument panel, one hand’s width, you’ll know you’ve got it right because the altimeter will remain steaady, your instructor taught you. If they were a good instructor they also taught you that the height of the horizon in the window depended on how fast you were flying too. You get all that. You’re an expert!
The problem in a steep turn is that the the horizon isn’t horizontal in the window any more. It’s up on the left and disappears on the right, or vice versa. Perhaps for steep turns you were taught some ridiculous nonsense about the horizon going from the corner of the window to the middle of the instrument panel. Or vice versa. I forget which. And anyway it changes depending on which seat you’re sitting in. How does that help you before you arrive at 45 degrees of bank? Or during the rollout back to straight flight? It doesn’t. We need something better.
A better pitch reference
Let’s learn a lesson from the instrument flying book. Look at this picture of an Attitude Indicator. See the little yellow dot in the middle? That’s your pitch reference. No matter what bank angle you have, when that yellow (or orange or white) dot is above the horizon reference 1 on the AI, the nose is above the horizon, and vice versa.
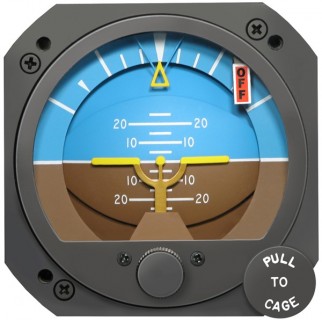
If you’re in level flight and you need to lose a few feet in altitude then you let the line graze the top of the dot as you lower the nose a touch. If you need to gain a few feet, the line can touch the top of the dot as you raise the nose. But level flight on instruments is basically a love affair between that little yellow dot and the white horizon line. The two are never far apart.2
Now I’m not suggesting you use the AI for pitch reference in a steep turn. What I am saying is find the right horizon reference – also a dot – to use with the real horizon. What you’re looking for is actually the vanishing point of the longitudinal axis of the aircraft. With the aircraft in level flight at cruising airspeeds that point is right in front of your nose, in the forward direction, a half or one degree above the horizon, depending on altitude (see this post for why that might be). Your reference point on the airframe is where that point at infinity appears in the windshield. We’ll call it the FVP – the Forward Vanishing Point – for short.
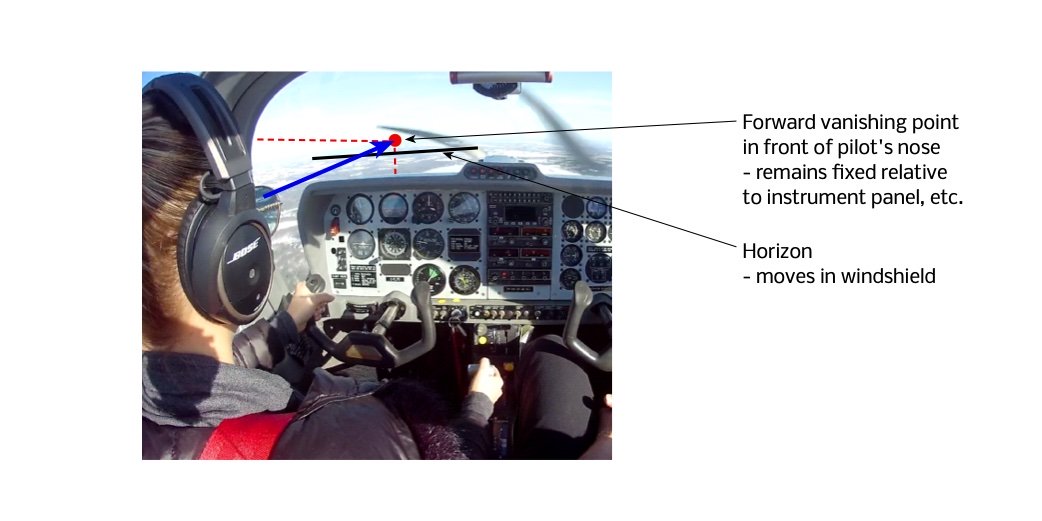
Note the FVP is at a different place in the window depending on which seat you’re sitting in. Also it’s probably not centred above the yoke, or above the middle of the attitude indicator, either: in many small airplanes the pilot’s seat is not centred in front of the instruments, and the FVP is always in front of you, wherever you sit.
You can keep track of the FVP in various ways:
- You can put a sticky dot on the inside of the window, or draw an x with a dry-wipe marker pen,
- you can grip the instrument shield with your non-stick hand (probably the right hand, if you’re in the left seat) and extend your index finger up so your finger tip is at the FVP, or,
- you can just imagine it. This is the easiest way, and works well after a bit of practice.
Just remember the FVP is always in front of your nose when you look forward in the direction of flight.
Maintaining level flight when you roll into, maintain, and roll out of your steep turn, involves keeping the FVP on3 the horizon. That’s all there is to it.
What about that extra lift?
In entering a 45° steep turn you need 40% extra lift to maintain level flight. That means you need to increase the angle of attack by about 40%.4 (You probably thought that was why you needed to pull back on the yoke so hard, but it isn’t.) During typical flight your angle of attack is around 5° so you need perhaps 2° extra nose-up pitch. That’s about the width of your thumbnail at arm’s length – really quite small. Plus, those extra 2° of nose-up are tilted at 45° to the horizon, so the apparent distance you need to further raise the FVP above the horizon is less than 2°.
Happily, you’re already great at making small pitch adjustments of that kind. You do it automatically flying straight-and-level. Adjusting the FVP above and below the horizon in a steep turn is exactly the same.5 Monitor the altimeter, and move the FVP with the elevator just like you would move the horizon in straight flight to maintain altitude. You already know how.
The one difference in a steep turn is that now you’re trying to do it with the aircraft out of trim. A challenge, but not a very difficult one. If you wished, you could re-trim the aircraft in the steep turn; but it’s not really necessary.
Putting it all together
- First identify your FVP, while in level flight.
- Then roll into the turn, using coordinated rudder and aileron and adding progressive back pressure on the yoke to stop the FVP dropping below the horizon, as you roll. This is much easier than trying to line the horizon up with the corner of the windshield, or the middle of the instrument shield, if you were ever taught to do that.
- At the same time, add power to maintain airspeed.
- Track the FVP along the horizon6, adjusting back pressure to maintain altitude.
- When you’re ready to end the turn, reduce power and roll out, again using coordinated rudder and aileron, and keeping the FVP on the horizon as you do so.
Job done.
Fix your head position
First caveat: the FVP remains fixed in the windshield as long as you keep your head still. You’re going to have to turn your head to look out for traffic (that’s the really important part of a steep turn, after all), and maybe lean forwards in your seat too. So remember to put your head back in the same place to check your pitch reference. If you’re using your finger to mark the FVP, you have to keep your finger still too. No twitching. In practice, however, once you nail the roll-in to the turn, you barely need to refer to the FVP again. It’s much easier to keep the horizon in the right place, if it never strayed during the turn entry.
Steeper bank angles
Second caveat: in level flight one gets used to judging one’s angle of attack (and hence one’s margin above the stall) by how far above the horizon the nose is. In a banked turn the angle of attack is less obvious, and becomes less so still as the bank angle increases.
At 45° of bank the position of your FVP above, on, or below the horizon is still an adequate way to control angle of attack and lift: it’s still effective to think about how the nose rises or falls above and below the horizon when you pull back or or relax the elevator to gain or lose a little altitude. But as turns get steeper the nose rises less and less, though you pull back more. At 90 degrees of bank you can pull back as hard as you like and of course the nose won’t rise at all. Whatever you do, keep the inclinometer ball centred at all times, and don’t fall into the trap of trying to regain lost height by lifting the nose of a steeply banked airplane above the horizon by yawing with rudder instead. At best that will put you in an aggressive slipping turn, and cause you to lose altitude rapidly.
Go forth and fly
So there you have it. Knowing where your Forward Vanishing Point is and keeping it on the horizon as you roll in and out of steep turns is my Jedi mind trick for the day. Go and try it. Or maybe just go and do it, because as Jedi Master Yoda points out, there is no try. Only fly.
- assuming you adjusted the AI correctly, of course
- In fact the width of the dot represents a pitch change of exactly 5° which is plenty of wiggle room to maintain level flight.
- or just above – in practice, your natural skill at maintaining level flight will fix the difference for you
- if you keep the airspeed the same
- I felt a great disturbance in the Force, as if millions of flight instructors suddenly cried out “Learning Factor of Relationship!” and were suddenly silenced.
- If you use your finger to keep track of the FVP I even have a song you can sing. It goes like this: “Put your finger in the air, in the air. Put your finger in the air, in the air. Put your finger in the air, roll it round the horizon there, put your finger in the air, in the air.“