Hello!
Welcome to your first real flying lesson! In this lesson I will introduce you to the basic natural behaviour of a real airplane, while we look at the principal flight controls and what they do.
Although we want our airplane to go up, and down, and go fast, and slow – alas – airplanes don’t have an “up” button and a “down” button, or a “fast” button and a “slow” button. Instead there’s an elevator control, an aileron control, a rudder control and a throttle control. Using any one of these controls causes multiple changes to the aircraft behaviour.
You will need to combine inputs to more than one control at a time to make the airplane do what you want. To do that correctly you have to have an idea of how an airplane responds to each of the controls individually. And that is what we study in this lesson.
What’s on this page?
This page consists mostly of instructional text and diagrams for you to read and learn. At the end of the page there is also:
- an excerpt from the Transport Canada Flight Training Manual that you should download and read,
- a short quiz with a few questions I want you to answer. Going through the questions and sorting the wrong answers from the right ones will help you learn, and
- some more advanced questions to think about in your own time. (You might want to revisit these at a later date.)
Principal axes
First let’s set up some common language for talking about an airplane. We begin by describing the three principal axes of an aircraft: the lateral, longitudinal, and normal axes.
The lateral axis goes side-to-side, the longitudinal axis is front-to-back, and the the vertical (or “normal”) axis is top-to-bottom.

Aircraft movements and control surfaces
The aircraft is free to rotate around each of its principal axes. When it turns about the longitudinal axis we call this bank, or roll. Principally we use the ailerons to bank or roll the airplane, and we activate the ailerons by turning the control yoke to the left or right.
Normally we limit the bank angle of the aircraft to not more than 45° to either side. (If a manoeuvre involves a bank angle of 60° or more, Transport Canada considers it to be an aerobatic manoeuvre.)
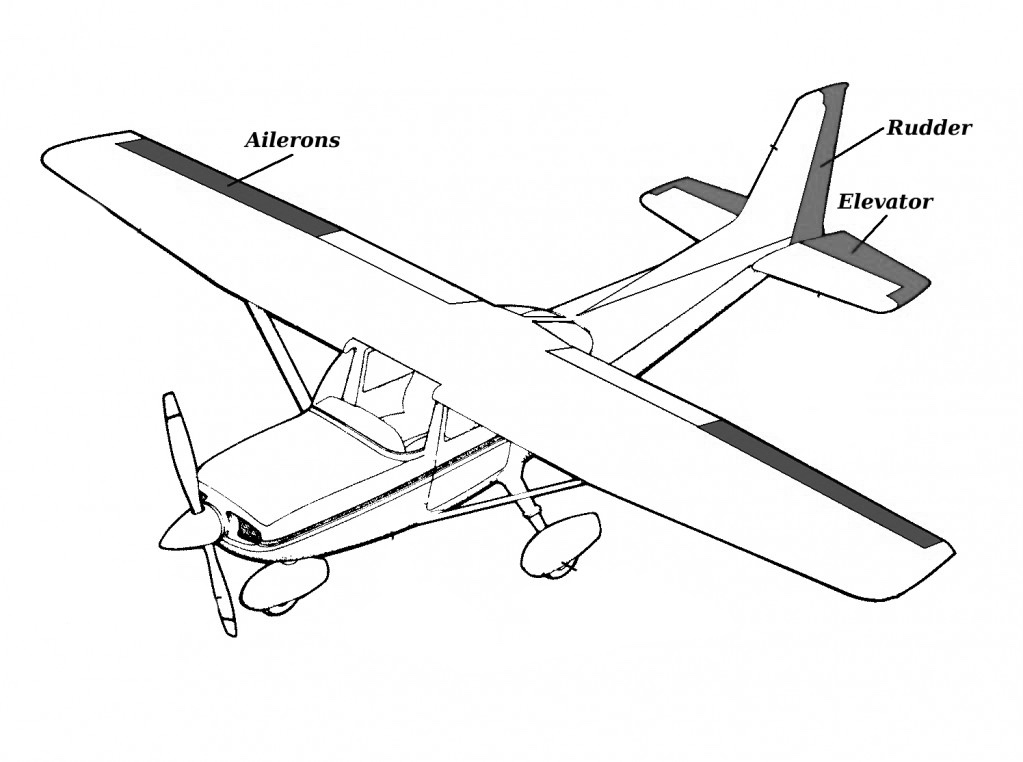
When the aircraft rotates around the lateral axis, we call this pitch. Pitch is controlled primarily by the elevator, which moves when we push or pull the control yoke. In normal flight we limit our pitch attitudes to no more than about 20° nose up or 20° nose down. 20° of nose up means we can see only sky in front, while 20° of nose down results in filling the windscreen with ground.
Finally when the aircraft rotates around the normal axis we say that it is moving in yaw. We control yaw by using the rudder, which is connected to the foot pedals.
Aircraft attitude
The attitude of the aircraft is its orientation with respect to the horizon. Control of the aircraft attitude is the way to control what the airplane does.
We can describe the airplane as being pitched up or down – when the nose is tilted above or below the horizon, or banked left or right if the aircraft is tilted over to its left side or right side, relative to the horizontal.
When flying it’s important that you look out of the window at the horizon as much as possible, then you will detect and control small changes in aircraft attitude. It also means you stand the best chance of seeing other aircraft in the sky nearby and can avoid them before they become a hazard to your safety.
Flight instruments
For your first flying lessons, there are four flight instruments that are important. They are: the airspeed indicator, the altimeter, the tachometer and the inclinometer (“the ball”). They tell us everything we need to know at this stage about what the airplane is doing. For now you can ignore the other flight instruments – the attitude indicator, the vertical speed indicator and the heading indicator.

For safety we also need to keep a periodic check on engine parameters like oil pressure and temperature, cylinder head temperature, the electrical bus voltage and current, and the fuel gauges. That way we will find out early about any impending aircraft system problems we need to deal with.
Controlling the power
The power to fly the airplane is provided by the engine. We adjust the power by moving the throttle lever: push the lever away from you to increase power, and pull it towards you to reduce power.
We measure the power produced by the engine by using the tachometer, which tells us the propellor speed in revolutions per minute (RPM). Using RPM to describe how much power the engine is providing isn’t a perfect way of doing it, but it is straightforward. As in many cases in flying we sacrifice a little accuracy for the sake of a lot of convenience. (Can you think of any reasons why measuring RPM is not a perfect way to measuring power?)
It’s useful to have some go-to RPM settings depending on what we are trying to achieve. Typical power settings that we might use are:
| Stage of flight | RPM or throttle position |
|---|---|
| Takeoff and climb | Full throttle |
| Fast cruise | 2550 |
| Slow cruise | 2200 |
| Descending | 1700 |
| Preparing to land | 1500 |
| Just before touchdown | Idle throttle |
These numbers are not set in stone and you will use other power settings as needed. But they give you a starting point to set the power according to what you are trying to achieve.
When we change the power setting – just like moving any of the control surfaces – the airplane has a natural response, which you should learn:
- Reducing power (without changing any other controls) causes the aircraft to pitch nose down and to descend. Contrary to what you might expect, the airplane will not slow down. It might even speed up.
- Adding power (without changing any other controls) causes the opposite: it makes the aircraft pitch nose up and climb. The airplane will not speed up, and it might even slow down.
These responses might seem a bit odd at first. Why should an airplane go faster if you reduce power? Nevertheless, this is what happens.
Using the elevator
These are the basic airplane responses to using the elevator:
- If you pull back on the yoke the aircraft will pitch nose up – start to climb, and – slow down.
- If you push forward on the yoke the aircraft will do the opposite. It will pitch nose down – start to descend, and – speed up.
Using the ailerons
If you turn the yoke to the left the airplane will bank to the left, and – start to turn to the left. If you turn the yoke to the right the airplane will do the opposite. Whichever way you turn the yoke, the airplane will also pitch down – descend, and – speed up.
Observe that there is a difference between the ways the elevator and the ailerons behave. When you move the ailerons from their neutral position the aircraft develops a roll rate. That is to say, the aircraft bank angle keeps increasing until you return the ailerons approximately to the neutral position. If you don’t put the ailerons to neutral the aircraft will continue to roll, even as far as upside down.
In contrast, when you move the elevator to a new position the aircraft moves to a different pitch attitude. It doesn’t keep rotating in pitch.
Learn to recognize and control the aircraft attitude by becoming aware of and responding to small movements of the horizon in the window. It must become second nature to you to use the flight controls to hold the horizon steady in the window in order to fix the aircraft attitude.
This is probably the most important element in this entire lesson:
Control the horizon – control the airplane.
Using the rudder
Among the flight controls the rudder is the “odd one out”. Firstly, we use the rudder to control the aircraft in yaw, but – unlike pitch and roll – there’s no such thing as a “yaw attitude”. (Can you work out why?)
Secondly, many aircraft are designed so that in some situations the rudder is hardly needed. Unfortunately this leads to many student pilots developing “lazy feet” because they believe that the rudder is never needed. Don’t let this be you! There are times when a great deal of rudder input is needed.
How can we best understand what the rudder is for? First note that the vertical stabilizer – the non-moving portion of the vertical fin of the airplane – has the crucial role of keeping the back of the plane behind the front. Without the vertical stabilizer the airplane will have a fatal tendency to swap ends violently in flight. (Think of how a frisbee spins in the air.) With the vertical stabilizer attached, the tail end of the airplane is forced to stay in line behind the nose, where we want it.
Alas, the vertical stabilizer alone doesn’t do a perfect job of keeping the airplane flying straight. Often the tail of the airplane will “step out” to the side and the airplane will fly “crooked”. We use the adjustable portion of the vertical stabilizer – the rudder – to correct this crookedness and tuck the tail back in behind the nose.
You, the pilot, should know the answers to the following three questions:
- When does the aircraft try to fly with its tail sticking out to the side?
- Why does the aircraft try to fly with its tail sticking out to the side?
- How do you know how much rudder to use to stop the tail sticking out to the side?
Adverse yaw
There are several reasons why the aircraft may try to fly crooked through the air. We categorize them under the title of adverse yaw — yaw that is unwanted and adverse to our intentions.
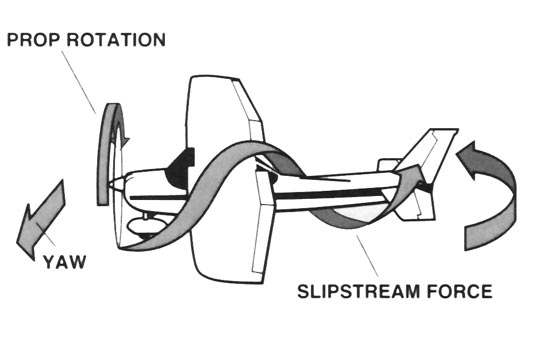
Spiral propwash: The turning propellor throws air backwards in a helical path behind the aircraft. This spiral of air hits the left side of the vertical stabilizer rather than the right which tends to push the tail to the right and the nose to the left. This effect is most pronounced when the aircraft is flying slowly and the engine is producing full power.
P-factor: When the airplane flies slowly it does so with a very nose-high pitch attitude. The propellor disc is tilted with respect to the direction of flight. This means that any blade on the right side of the aircraft is moving down-and-forwards, and therefore faster through the air, and so develops more thrust – than any blade on the left, which is moving up-and-back. There is also a minor difference in the angle of the two blades which contributes to the same result. Overall, more thrust on the right side causes a left-turning tendency.
Gyroscopic effects: although minor in training aircraft, airplanes with very heavy propellors or crank shafts can display a considerable amount of gyroscopic coupling: any significant pitching movement will also lead to yaw effects.
In the cockpit it’s not important for you the pilot to distinguish between these different effects. However you must know that when the airplane is flying slowly, and especially when doing so with a high power setting, it will have considerable tendency to yaw to the left. The most obvious phase of flight when we fly slowly and with high power is right at takeoff. At takeoff the student pilot is tempted into making one of two mistakes.
- If the student isn’t looking out of the window, the aircraft will turn to the left, uncorrected.
- If the student is looking out of the window he or she sees the aircraft turning to the left, and recalling that the ailerons are used to turn the aircraft, uses them to bank the aircraft to the right.
Either situation is undesirable. In the first case the aircraft is wandering along a curved path through the sky, uncorrected. In the second case the aircraft is flying on a straight track, but oriented crooked to the direction that it’s flying, which is both uncomfortable and inefficient.
The competent pilot maintains a wings-level attitude and opposes the left-turning tendency by adding right rudder. The experienced pilot doesn’t need to wait for the nose to pull to the left to add right rudder, but anticipates it and adds rudder smoothly so the nose of the aircraft doesn’t ever deviate at all from straight.
Aileron drag
A second situation when the nose of the airplane is likely to step out of line is when we use the ailerons to bank the aircraft.
The ailerons work by changing the relative quantities of lift on the two wings. More lift on the left wing and less lift on the right will cause the aircraft to roll to the right. And vice versa. The creation of lift is inevitably accompanied by the creation of drag. More lift means more drag. So creating more lift on the left wing to roll the aircraft to the right is accompanied by more drag on the left wing, causing a yawing tendency to the left.
When we roll the aircraft to the right we usually want the nose to yaw to the right also. The natural yawing behaviour of the aircraft in response to roll is in the wrong direction. The solution is to use the rudder at the same time to override the unwanted aileron-drag induced yaw.
In all cases the aircraft gives us a certain amount of natural yaw. We often have to add opposite yaw to achieve just the right amount of total yaw. We may say:
natural yaw, plus yaw applied by pilot with rudder, adds up to correct yaw
In practice this means that when rolling to the left we need to push on the left pedal, and when rolling to the right we need to push on the right pedal.
Step on the ball
How do we know when we’re using the correct direction and amount of rudder at any time and the airplane is flying tail-behind-nose?
The answer lies in the instrument we call the inclinometer, or more casually, “the ball”. If the ball is displaced to the left of centre we must add more left rudder by pushing with the left foot. If displaced to the right, push with the right foot. In the simplest terms:
step on the ball
The times we need to use the most rudder are when flying slowly (particularly with high power, such as at takeoff) and when turning the aircraft. Entering a turn, maintaining the turn, and exiting the turn all require different amounts of rudder input. We don’t need to delve any more deeply into how much rudder to use at different phases of a turning manoeuvre as long as we remember the rule to follow at all times:
step on the ball
Work hard to develop the habit of periodically checking the ball position as you fly and adjusting the rudder position as required.
Where should your eyes be?
A huge part of learning to fly an airplane is making your eyes look at the right things.
- About ninety percent of the time your attention should be on the horizon, being conscious of small changes in aircraft attitude and how your control inputs affect it. You also spend this time scanning for other aircraft in the sky.
- Nine percent of your time your eyes are checking the aircraft altitude and airspeed to check that the airplane performance is what you want it to be.
- One percent of your time your eyes are checking the tachometer, oil pressure, oil temperature and aircraft electrical systems.
Helpful hint: you don’t need to look at a flight instrument for more than a brief second to read what it says. Move your eyes back outside while you think about things.
Don’t be a bison – watch the horizon!
The cruise attitude
Before we experiment with the effects of the controls we will set the aircraft up in stable flight: wings level, neither climbing nor descending. We’ll call this “home position” the cruise attitude. You’ll see that the horizon is level across the windscreen and about one third of the way up.

After we use the controls to move the attitude I’ll ask you to return to the cruise attitude — remember: wings level, horizon about one third of the way up.
What will we do during our flight?
For this lesson you should get experience at moving all three flight controls and the throttle and seeing the effects of each on the aircraft.
I will introduce you to adverse yaw and the need to use the rudder to keep the nose in line during the take-off.
We will look at a rudder coordination exercise that I call “rolls on a point”, and I will also show you a phugoid oscillation and how good pilots avoid them.
Ask me any questions you have before, during or after the flight. And I will welcome your comments and feedback about how it went. It’s a busy flight and there’s a lot to learn. I hope you have fun.
Things to remember
It’s hard to keep a head full of facts during your first flying lessons. I will guide you through what you have read and what we talked about on the ground while we fly. However, here are some principles you should try to bring with you when you climb into the airplane.
- Don’t be a bison, watch the horizon.
- Control the horizon – control the airplane.
- Step on the ball.
- Read the altimeter and the airspeed without staring at the instruments
- Periodically check the oil pressure, oil temperature and fuel gauges
- The most important thing: enjoy being in the air!
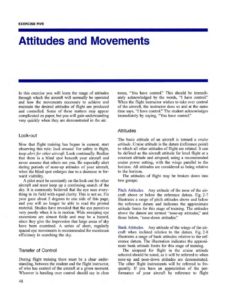
Flight training manual
Here is the chapter on attitudes and movements from the government’s Flight Training Manual. Please download and read it.
Questions for you to research and us to discuss
If you’ve read and now understand all the material here, please take some time to think about the following questions. Feel free to look at other websites to find the answers too. If we have time we can talk about what you found out.
- What factors make RPM (and the tachometer) a less-than-perfect way to measure the power the engine is producing? Why does the RPM vary in flight even when we don’t adjust the throttle?
- Why is there no such thing as a “yaw attitude”?
- In what phases of flight are only very small (or perhaps no) rudder inputs needed? What physical features of the aircraft make this possible? Is this desirable?
- Much of the time when flying I have to apply continuous pressure to the right rudder pedal to keep the ball in the middle. What would I be doing with an airplane if, to keep the ball in the centre, I had to apply continuous pressure to the left rudder pedal?
- If the engine turns in the opposite direction to usual what happens to each of the rudder inputs I need to make during a flight? Where would I get an engine that turned “the other way”?
- Why does the aircraft speed up when the power is reduced?
- What is a phugoid oscillation? How can I deliberately create one, and why does it occur?
Happy thinking!
Quiz on attitudes and movements
When you’ve finished reading this page, please answer the questions below. It’s a good way to assist learning the material.