The impossible turn

by
Posted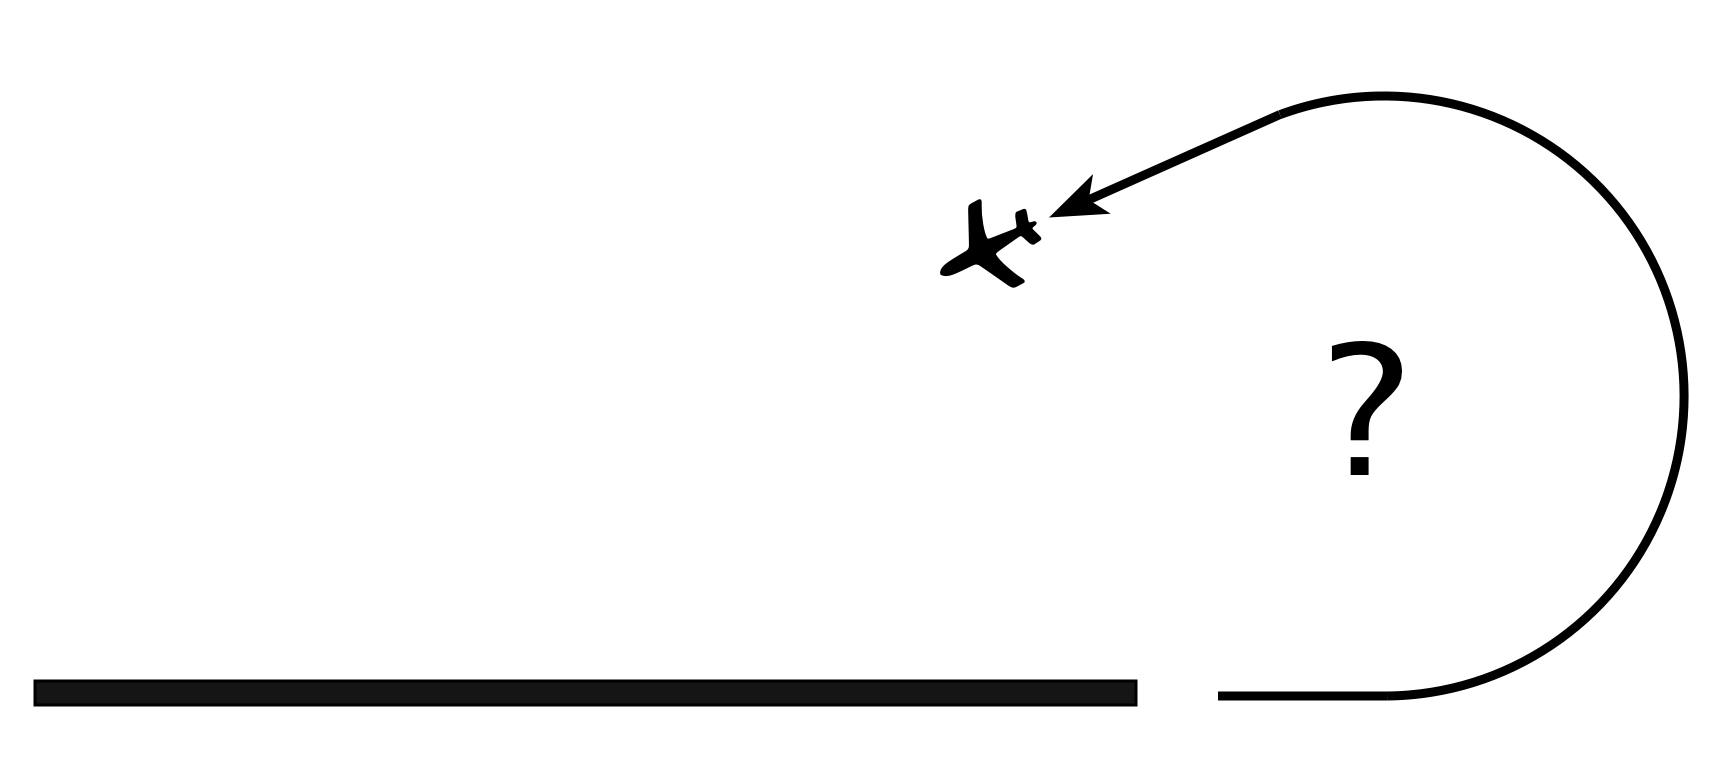
THIS POST addresses an issue that consumes a lot of discussion time among pilots, whenever they get together: the engine-failure-after-takeoff (EFATO) and the decision on whether to try to turn back to the runway, or to try to “land ahead”.
The wise, sober voices say that the accident rate among pilots who try to turn back is so high that, whatever you see in front of you immediately after takeoff, it’s better to go and land (or crash-land, or crash) there than to make any effort to manoeuvre the aircraft to left or right, at such a low altitude and at such a vulnerable time.
And I think this is great advice if you habitually fly out of a small, rural aerodrome surrounded on all four sides with green fields and flat terrain.
However I do think that at some airports, a blanket decision to “go straight ahead” is a recipe for someone’s death, most probably yours. For example, flying out of CYTZ you have water: the Toronto harbour and Lake Ontario are immediately at the ends of both runways. And it being Canada here, the water temperature is close to freezing for nine months of the year – if the harbour itself is not frozen over with a thin or thick layer of ice.
If you need convincing about the difficulty of surviving ditching an airplane into such conditions remind yourself how many snowmobile riders who mistaken crash through thin ice into freezing water are rescued alive. And they would typically already be wearing a flotation vest, neither are they faced with the hurdle of escaping a sinking airplane, possibly injured, and possibly upside down.
So before we abandon any thought of turning back towards the dry flat land of the airport of departure let’s look at the mechanics of what we’re asking an airplane to do, in order to get us back to the safety of the aerodrome.
45° bank, just above the stall speed
Every pilot spends a fair amount of time in their single engine piston plane configuring and achieving “best glide” configuration. The pitch attitude (and therefore airspeed) that without engine power will take the plane the furthest distance possible for its altitude. That way you get the best choice of fields, or roads, or forest to land the plane.
In the case of an EFATO if we are determined to get back to the airport the configuration we’d like is a banked turn – at an angle of bank and an airspeed that when that part of the manoeuvre is complete gives us the best chance of gliding straight ahead to land. An academic paper by Professor David Rogers of the US Navy Academy concludes that the best configuration to use is a 45° banked turn, at an airspeed about 5% above the stall speed in the turn. He suggests that the pilot should turn through 190° to 225°, to end up facing back towards the aerodrome.
My experience and experiments in different light aircraft pretty much agree with this conclusion: that you can achieve the minimum loss of altitude without power in turning through 180° (back the way you came) by using a 45° bank, at an airspeed just enough to keep the stall warning horn from sounding. (If you have a stall warning light or horn that comes on early, then maybe you want the stall warning horn sounding or light illuminating on an intermittent basis.)
The detractors of the turn-back will usually suggest that this is an expert manoeuvre: one which PPL-level pilots should not be expected to achieve in an emergency situation. It’s definitely true that if you try the turn too slowly you will stall and lose more altitude, and possibly lose control of the aircraft completely. While if you mishandle the rudder at the same time, perhaps by trying to hurry the turn, you are likely to enter a spin, which is inevitably a fatal error.
Transport Canada’s document on Stall/Spin awareness training says:
An evaluation of stall/spin accidents in Canada showed that the pilot [who tries to turn back] is eight times more likely to be killed or seriously injured turning back than landing straight ahead. For expert pilots who know how much altitude is needed to complete the required manoeuvring, it can be an option but even experts should be looking for landing areas that require less manoeuvring and less risk.
But it also provides a recipe for student and instructor practice of the same manoeuvre:
At a safe altitude,
In cruise configuration, establish the best rate of climb speed (Vy). Note your altitude.
Reduce power smoothly to idle to simulate the engine failure.
Lower the nose to maintain the best glide speed and make a 270° turn followed by a 90° turn in the opposite direction to roll out on the reciprocal of the original heading.
Point out the altitude loss and emphasize how rapidly airspeed decreases following a power failure in a climb attitude.
Demonstrate the manoeuvre again and allow the aeroplane to stall during the turn. (This is actually a variation of an approach stall.) Emphasize the possibility of a spin developing from these types of stalls.
Transport Canada, which as a government agency is required to maintain a conservative approach to pretty much everything, is recommending that instructors and students go and practice this manoeuvre. I actually think that’s a great idea.
If you do go and practice, my suggestion is to work up to the following:
- Complete all relevant safety checks.
- From a safe altitude, configure and trim the aircraft for a power-off “best glide” descent
- Roll to a 45 degree bank, and apply enough back pressure to prevent the airspeed increasing. Don’t allow the bank angle to increase past 45°.
- Adust airspeed with yoke backpressure. Find the airspeed that activates the stall warning horn or lamp. If you detect roll instability or elevator buffet, which indicate a stall, relax the back-pressure and unstall the wing. If you spook yourself, relax the back pressure first, then roll wings level, add power, and climb away.
- Keep the ball in the middle throughout – coordinated flight is very important for safety.
- Stabilize the airspeed in the turn, and note the rate of descent indicated on the VSI
- As the nose passes a visual landmark, note the altitude on two consecutive passes, to find the height loss in a 360 turn.
- Optionally, and on a later attempt, use a stopwatch to time a 360° turn
- Before descending past a safe altitude, say 2000 feet agl, end the manoeuvre: roll smoothly out of the bank, apply power, and climb away.
Now, you aren’t going to achieve all these goals the first time. Work to find and memorize the correct pitch attitude and sight-picture for the airspeed you want at 45° bank. Get a feel for the amount of yoke back-pressure (relative to the trim for best glide) that you need to apply. Do this with an instructor in the other seat for the first attempt or attempts. While you have an instructor handy, follow TC advice further – maintain the 45° bank and deliberately apply extra back pressure to make the aircraft stall, so you’re prepared to know what it feels like to pull too much.
Performance
What you’ll find is that for a typical Piper or Cessna trainer a complete 360° turn at 45° bank with the stall warning intermittently activating, takes about 25 seconds and can be completed in about 600 feet of altitude. You will also find the diameter of the turn is about a quarter of a mile. Under best circumstances, therefore, a 180° turn can be completed in about 300 feet, and will place you about 1200 feet to the side of where you began the turn.
These figures are measured “on the fly”, so to speak (pun intended). They don’t take into account time or altitude to establish the turn, or to roll out of it.
Go and practice
When you are faced with a real emergency you are likely to be no more than half as good as your last day of recent practice. This is a second key point of this post: I strongly encourage pilots to include the following manoeuvre in their regular practice regimen:
- Complete all relevant safety checks.
- From a safe altitude, enter a full power Vy climb (to simulate post takeoff climbout).
- Passing a cardinal altitude, smoothly close the throttle.
- Count slowly to three (to simulate some time to get over the shock).
- Roll to 45° and position the nose in the attitude you previously memorized for the turn you worked on, above.
- After turning through 180° roll out of the turn.
- Note the altitude lost.
- Climb away.
You will find that with practice, and given the initial airspeed and rate of climb, you can quite easily get this whole manoeuvre done in little more than the 300′ that you know is possible. Transport Canada wrote “For expert pilots who know how much altitude is needed to complete the required manoeuvring, it can be an option”. If you work at it you will be become exactly that pilot – and it will be an option for you should you need it. Here’s a video clip of me practicing this with a student:
It’s only an option
It’s really important to remember, once you’ve worked on the turn-back manoeuvre a few times, that it’s only an option. It’s absolutely not necessary to turn back to the runway, and in many situations it’s still much better to go straight ahead. That decision really needs to be made based on an assessment of the risk of death or injury to the occupants and not on the probability of damage to the aircraft, which is a possibility either way.
Other uses
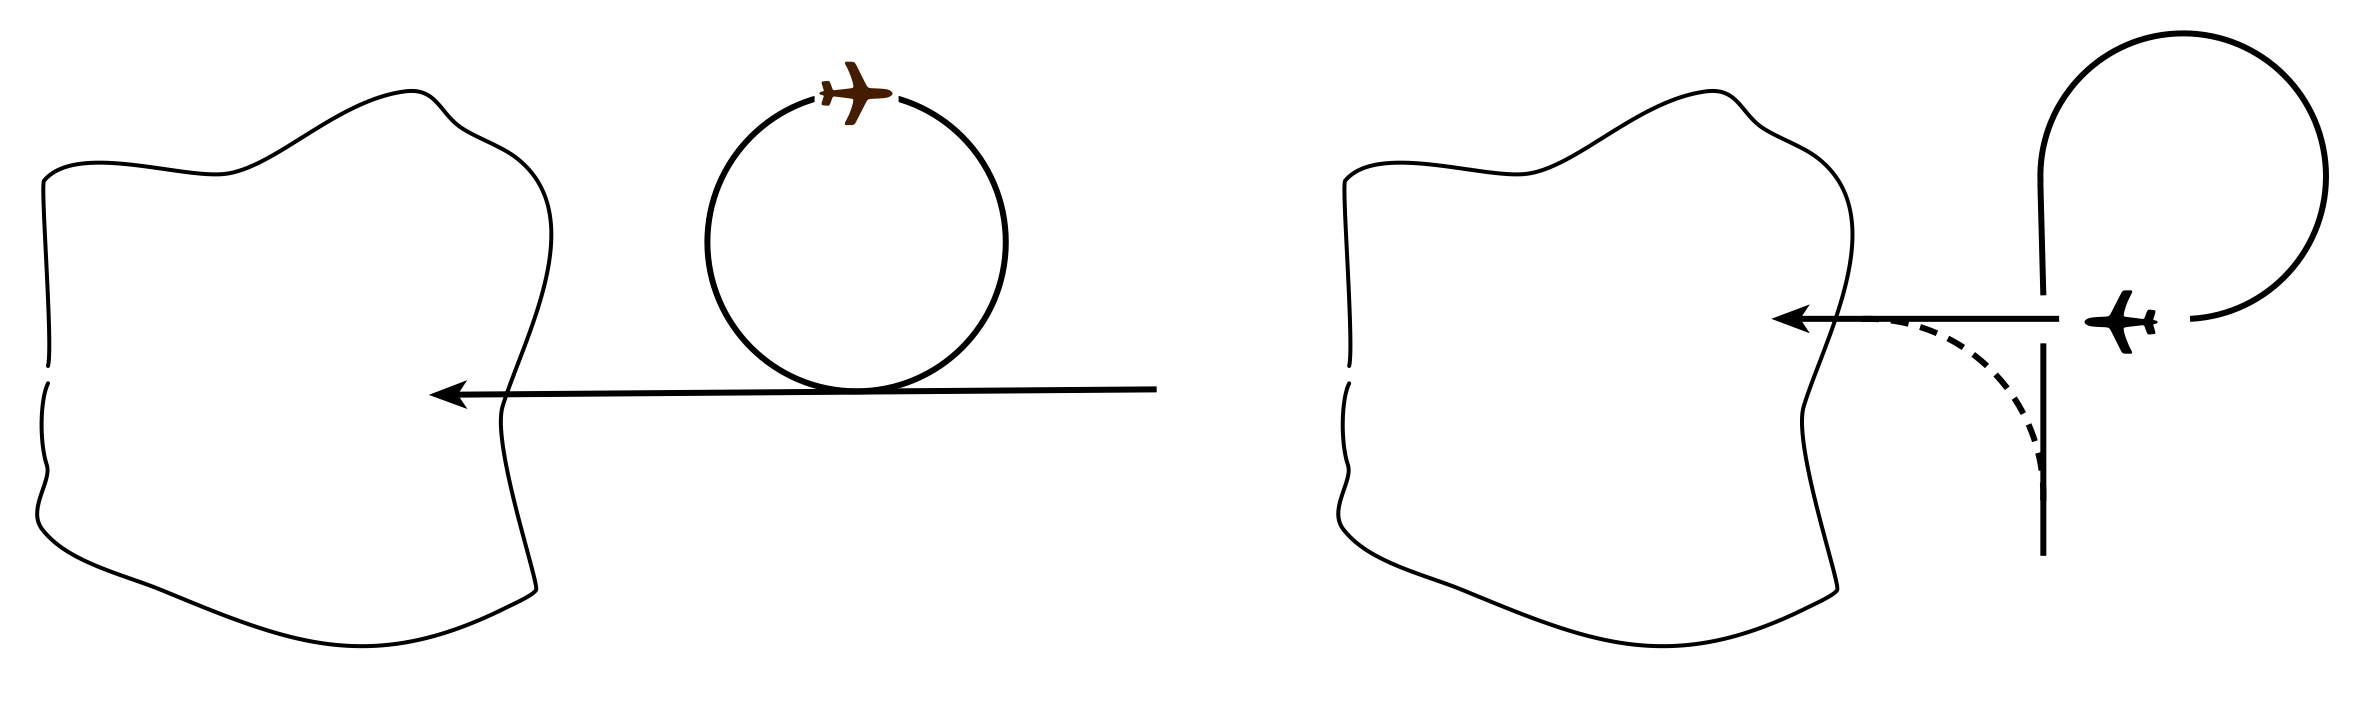
If you get the hang of setting up a minimum height loss turn, it may be useful in some other scenarios too – I find it quite useful during practice forced approaches. It’s fairly common in whatever gliding manoeuvre you’re trying fly, to arrive at a key point too high. And this is the closest you can get to losing height on the spot: each 360° turn puts you back where you started, about 600′ lower.
Alternatively, if you’re on a base leg in your forced approach work, but are still too high, you can fly a right-270 (instead of a left 90) to line up on your field.